


Private Home Nail Salon & Handmade Press-On Nails
Salon Services

Gel-X
Starting @ $75
Gel-X is a revolutionary nail enhancement system that uses pre-shaped, full-cover soft gel tips to create flawless, natural-looking extensions. These tips are secured with a specialized soft gel adhesive, ensuring a lightweight, durable, and flexible finish. Perfect for those seeking a quick, damage-free alternative to traditional acrylics, Gel-X extensions typically last 2-8 weeks, with most clients enjoying 3-4 weeks of wear.

Soft Gel Overlay
Starting @ $50
Soft Gel Overlay is a nail enhancement designed to strengthen and protect natural nails while maintaining a lightweight, natural look. Applied as a thin layer of soft gel, it adds durability and prevents breakage. This system typically requires maintenance every 2 weeks and is easily removed with a soak-off process.

Polygel
Starting @ $65
Polygel is a cutting-edge nail enhancement that blends the strength of acrylic with the flexibility of gel, offering a lightweight yet durable solution for beautiful nails. Enjoy stunning nails that last 2 to 4 weeks before requiring maintenance. Unlike some other enhancements, Polygel is not a soak-off product. For safe removal or fills, it must be gently filed off by a professional. Experience nails that are strong and resilient, yet feel comfortable and natural. Perfect for adding length, strength, or a new shape to your nails.
Polygel is the ideal choice for anyone seeking durable, long-lasting, and beautifully natural nails—without the heaviness of traditional acrylics.

Dry Gel Manicure
Starting @ $35
A Dry Gel Manicure offers a waterless approach to nail care, focusing on cuticle clean-up, shaping, and trimming for a polished look. It’s finished with a long-lasting gel polish that stays vibrant for up to 2 weeks and requires a soak-off for removal.

Dip/Gel Hybrid
Starting @ $50
Dip is a strong and durable nail enhancement that combines a gel base with dip powder, creating a long-lasting, glossy finish. It offers extra strength while remaining lightweight and natural-looking. Dip nails typically require maintenance every 2 weeks and are easily removed with a soak-off process.
Custom Handmade Press-On Nails (coming soon)

Ultimate French Glam

The Rose

Pixie Collection
Why Press-on Nails
Customizable Designs: Handmade and fully customizable, they cater to individual preferences, ensuring a unique and personalized style.
Reusable: Many press-on nails can be reused with proper care, making them a sustainable and practical option.
Damage-Free: Unlike traditional acrylics or gels, press-on nails don’t require harsh chemicals or filing, keeping natural nails healthy and intact.
Convenient: Perfect for last-minute events or a quick style change, press-on nails offer flexibility for any occasion.
No Salon Visits Needed: Eliminates the need for regular salon trips, saving both time and money
How It Works
Select the style of nails you want.
Select your shape, length, and size. Below is instructions on how to measure your nail sizes and record them for custom fit orders. ***(For best fit, it is highly recommended to order a sizing kit. Different shapes fit differently). If you do not see or fit the measurements for the pre-sized sizes you will need to select/order custom for your size. Once you select your option and add your item to the cart you will have a custom request form pop up. This is where you will text your measurements and art requests.
Customize your order in the Custom Request section. In the message section you will place your custom sizing as it is explained in the instructions below in step 2. If you have a set that has accent nails (example: The Rose set has 2 rose accent nails on each hand) and want them on different fingers then they are placed from the picture then put a ( * ) next to the finger size you are wanting them on. OR if you are not custom sizing just write out which hand and fingers you are wanting them on. Also any special requests like matte instead of gloss top coat can be made in section as well. Please have any special request clear. If I have any questions, I will be reaching out by e-mail from the information you leave on the order placed at check out.
How To Size Your Press-On Nails

How to Measure your Nails in Milimeters:
Step 1 Lay a soft measuring tape over the widest part of your nail pulling down tight to account for any curve of your nail. Note the width of each nail in milimeters for each finger, at the widest part.
OR
Stick a piece of tape across the widest part of your nail pressing down to account for any curvature. Pull the tape off your nail and measure the distance between your marks of each nail (thumb, index, middle, ring and pinky) with a measuring tape or ruler in millimeters.
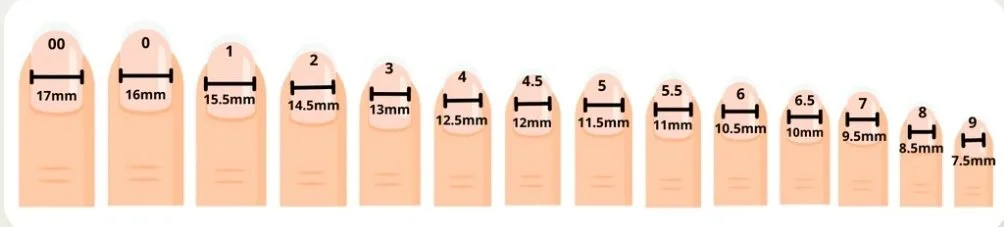

Step 2 Now that you've recorded the width (accounting for any curve) of your nails in millimeters, use the chart to determine your individual nail numbers (00-9) and the corresponding size kit to select (XS, S, M, L, XL).
*If you are between sizes it is safer to go up one size.
For custom Orders: (Thumb, Index, Middle, Ring, Pinky) - Example: Right: 16mm, 12mm, 15mm, 12mm, 10mm. Left: 16mm, 12mm, 15mm, 12mm, 10mm.
Policies
In-Salon Policy
1. Accurate Scheduling Required
Ensure you select the correct service and any needed add-ons when booking. If your appointment is not scheduled accurately, I may not be able to complete all requested services during your visit. Service pricing will also be adjusted at your appointment if the correct service is not selected when booking.
2. Nail Art Pricing & Scheduling
All services include regular gel polish. Nail art (such as cat eye, chrome, rhinestones, or detailed designs) is an additional charge and requires extra time.
If you do not schedule the correct nail art level, the price will be adjusted at your appointment to match the actual work performed. If you do not book enough time for your desired design, there may not be sufficient time to complete it during your appointment.
3. Rescheduling & Cancellations
You may reschedule or cancel your appointment up to 48 hours in advance online. After that, TEXT the business line directly.
4. No-Show, No-Text & Late Policy
If you do not text or show up for your appointment (“no show, no text”), you will be banned from booking future appointments until a $50 no-show fee is paid. Arriving more than 10 minutes late may result in your appointment being shortened or rescheduled. Last-minute cancellations (less than 48 hours) should be communicated by TEXT as soon as possible.
5. Communication
If you’re unsure what to book, please TEXT before scheduling. I want to ensure you get the service and time you need.
Press-On Policy
All press-on nail sets from Kristyns Nails LLC are 100% custom and handmade to order. To ensure the best fit and result, please follow the ordering process below:
Select your set — Browse our available designs and choose the set you love.
Submit your sizing — Accurate sizing is required at the time of ordering. A sizing guide is available on the website to help you measure correctly. Orders cannot be processed without sizing information.
Confirm your design details — If your order includes customization options (such as sizing, finish or colorway), please select your preference at checkout.
Complete payment — Full payment is required to confirm and begin your order.
Order confirmation — Once your order is placed, you will receive a confirmation. Please allow up to 48 hours for a response to any order-related inquiries.
Custom Order Policy
Every set is made to order — no pre-made inventory is carried.
You have up to 24 hours from the time your order is placed to request a cancellation. After 24 hours, production may have begun and cancellations will not be accepted — absolutely no exceptions.
No refunds will be issued under any circumstances. All sales are final.
Please double-check all sizing, design selections, and details before completing your purchase.
Production time varies depending on the complexity of the design. Please allow 2 to 10 business days for your order to be handcrafted, processed, and shipped.
Sizing Policy
It is the customer's responsibility to provide accurate sizing at the time of ordering.
A sizing guide is provided on the website and it is highly recommended to order a sizing kit to know how they fit and what to order to fit your nail bed shape best. Please measure carefully before submitting your order.
If incorrect sizing is submitted by the customer, providing accurate sizing is the customer's responsibility. However, replacement nails can be made and shipped — simply reach out and the affected nails will be individually priced, handcrafted, and shipped to you. A full new set order is not required.
If you are unsure about your sizing, please reach out before placing your order and I will be happy to assist.
Shipping Policy
All orders are shipped with protective packaging to ensure your set arrives safely.
Each order includes:
Your custom press-on nail set in a secure case
Application kit (buffer, nail file, adhesive tabs, nail glue, alcohol pads, cuticle pusher)
Complimentary organic cuticle oil
Care and application instructions
Shipping times vary by location. Once your order has shipped, a tracking number will be provided.
Kristyns Nails LLC is not responsible for delays, lost, or damaged packages once they have been handed off to the carrier.
Refund Policy
All sales are final. Refunds are not offered under any circumstances.
Because every set is custom handmade to order specifically for you, returns and refunds cannot be issued once an order has been placed and production has begun.
Please review all order details carefully before completing your purchase.
Exchange & Remake Policy
Your satisfaction matters. While refunds are not offered, I stand behind my work and will make it right if a mistake was made on my end. If there is a verified error — such as the wrong design, a defective nail, or a sizing mistake made by me — I will remake the affected nail or nails and ship them to you. A full set remake is not required; only the nails that need to be corrected will be redone.
To be considered for a correction, the following conditions must be met:
The issue is a verified error on my part (wrong design, defective nail, or sizing error made by me).
The issue is reported within 48 hours of delivery with clear photo evidence.
Corrections are not offered for:
Incorrect sizing submitted by the customer
Change of mind after ordering
Normal wear and tear after application
Damage caused during or after self-application
Agreement
By placing an order with Kristyns Nails LLC, you confirm that you have read, understood, and agreed to all policies listed above.
Contact Us
Got Questions?
